A model differencing and virtualization approach for programming against multi-version metamodels
Examples and installation instructions
Installation Instructions
- Download the APT jar
- Create a new Java project in Eclipse, Java 8 is required
- Rightclick on the Project, click on “Properties”
- Go to “Java Compiler”->”Annotation processing”
- Click on “Enable project specific settings” – “Enable annotation processing”
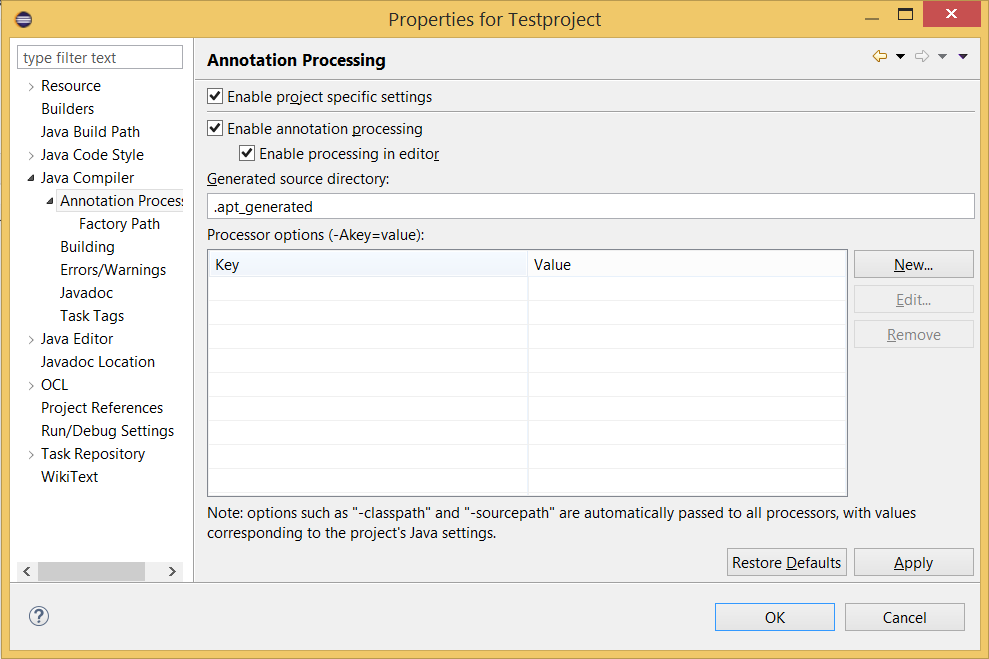
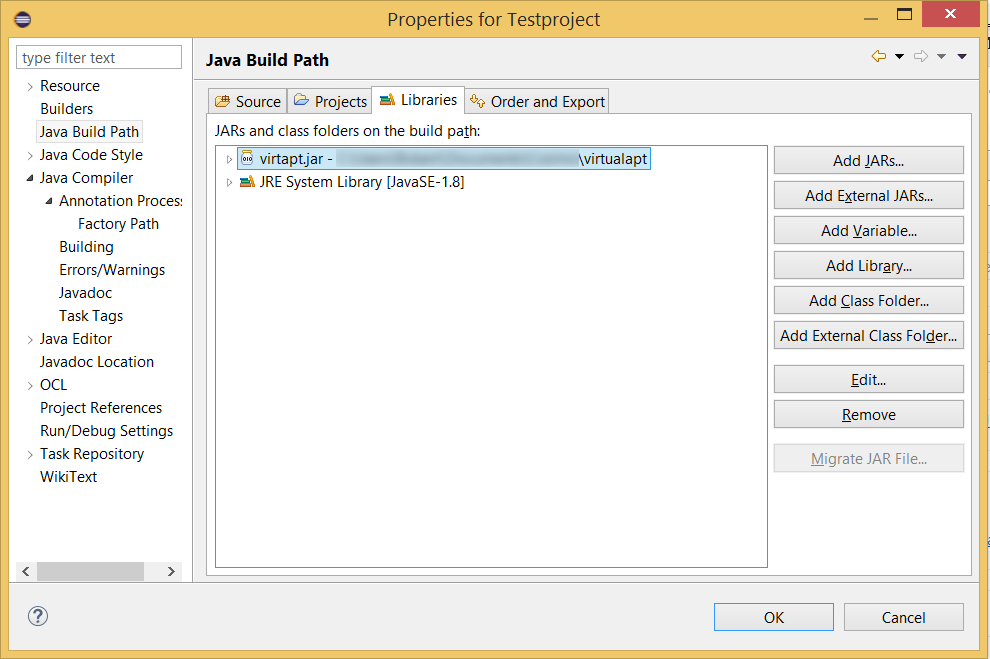
- Open “Annotation processing”->”Factory Path”
- Click on “Enable project specific settings”
- Click on “Add External JARs” and add the downloaded virtapt.jar

- Click on “Java Build Path”, then “Libraries”
- Click on “Add External JARs” and add the downloaded virtapt.jar
Then, you can add your .ecore-files to the project, e.g. in the subfolder models, and write annotations like @EcoreVM(name="PkgX",ecoreFiles={"model/ecore1.ecore","model/ecore2.ecore"}) in order to use the virtual model. Use PkgX.Manager.instance.loadFile(new File("model/ecore1.xmi")) to load instance data and consider the example files below.
Code reduction example
There are three annotations used which define the model sets mentioned above, namely two annotations for the model sets containing only two elements, @EcoreVM(name="PrimSec", ecoreFiles={"model/prim.ecore", "model/second.ecore"}) and @EcoreVM(name="SecUni", ecoreFiles={"model/second.ecore", "model/uni.ecore"}), and the annotation for the full model set,
{@EcoreVM(name="AllSchool", ecoreFiles={"model/prim.ecore", "model/second.ecore", "model/univ.ecore"}).
|
1 2 3 4 5 6 7 8 9 10 11 12 13 14 15 |
try { Manager manager = new Manager(); Collection<? extends BasicObject> loadedFile = manager.loadFile(new File("model/prim.xmi")); for (BasicObject bo: loadedFile) { for (Person p: ((School)bo).getPersons()) { if (p instanceof Student && ((Student)p).asPrimSec() != null) { ((Student)p).asPrimSec().setInClass(null); } } } manager.saveFile(loadedFile, new File("model/prim2.xmi")); } catch (IOException e) { System.err.println(e.getMessage()); } |
The purpose of our example method is to nullify the class of pupils at the end of the school year to demonstrate the use of the manager for loading and saving objects. The previous listing shows an implementation for that method which can be executed for any kinds of schools including universities, here nothing has to be done. To allow such a generic execution, all classes are imported from the AllSchool package. Initially, the manager.loadFile method is called with the file to be loaded as argument. This method returns a Collection of the contents of this file.
In our case, we might know that the contents are only School objects, so we directly retrieve the persons of that school. Since only students of primary or secondary schools are in a class, we select only those persons who are students and loaded from a primary or secondary school. If that is the case, we can Java-cast the persons to students and then virtual-cast the persons to primary-or-secondary-school students, where the method to set the class is accessible. After processing the persons that way, the school is saved again
under a different name using manager.saveFile. IO-Exceptions, which might occur if the file is not available or in an unsupported format, are not catched by the methods itself and thus must be caught by the developer.
|
1 2 3 4 5 6 7 8 9 10 |
//Primary school: New Teacher is in all classes //the old teacher was if (teacher.getSpecialOfVt1() != null) { newTeacher.getInClass().addAll((Collection)teacher.getInClass()); } else { //Others: teacher has all the additional courses SecUni.minterface.Teacher secUniNew = newTeacher.asSecUni(); secUniNew.getTeaches().addAll(teacher.asSecUni().getTeaches()); } school.getPersons().remove(teacher); |
Let us now consider the method which replaces a teacher by another teacher as second example as shown in the previous listing. For primary schools, this is done by adding all classes the old teacher was in to the new teacher and then removing the teacher. For other schools, this is done by adding all courses of the old teacher to the new teacher and then removing the teacher. The getSpecialOfVt1() method returns the same object if it belongs to the first model as defined in the annotation which thus is the model for the primary schoool, else it returns null. If it does not return null, we know there is an attribute inclass and thus we can set this attribute. For changing a collection, we have two options. In principle, the generic interface returns an immutable collection, i.e. Collection<? super T> instead of Collection<T> because the attribute is not settable. However, since we know we can add things to the collection, we can simply remove the generic parameter to add elements to the collection in this case.
For secondary schools and universities, we simply add all existing courses of a teacher to the courses of new teacher. Here, the teacher is first virtual-casted to the correct type where changing a collection is possible to avoid the compiler warning generated in the previous way.
After that, the old teacher is removed from the set of persons in the school.
Note that while this method body has six lines just like the three times two lines needed for each model separately, there are some hidden lines of code saved in this example for method declaration and code for loading each model individually.
Data migration example
|
1 2 3 4 5 6 7 8 9 10 11 12 13 14 15 16 |
public void registerInUniversity(List<Student> pupil) { List<Student> newStud = new ArrayList<Student>(); Date curDate = new Date(); int year = curDate.getYear()%100; //We want university students, so we take the last virtual model for univ.ecore CloneState targetState = manager.getCloneStateVt3(); for (Student pupil: pupils) { Student addRet = pupil.cloneNew(targetState); //The matriculation number can only be set in the university model, so cast to it. //Matriculation numbers are class properties addRet.getSpecialOfVt3().setMatrNr(year*10000+curMatrNr); newStud.add(addRet); ++curMatrNr; } manager.saveFile(newStud, new File("model/univstud.xmi")); } |
Since it is possible to clone objects generically using a CloneState, the presented approach also provides means for migrating data. An object can be partially automatically migrated into another model by creating another object of the same class and setting all attributes and references to migrated versions of the attributes and references of the original object. While cloning of objects is always possible, this approach allows to clone objects while changing the model to any the CloneState’s manager supports.
The previous listing shows a simple example on how to migrate a list of students possibly coming from different schools and/or universities into a specific university by copying their name and email, but setting their matriculation number to a custom value.
The cloneNew-method will copy exactly name and email for Persons since these attributes are occurring in all models and thus settable in AllSchool.Person.
Since the matriculation number attribute does only exist for universities, the cloned
student has to be casted to the university-specific class to gain access to
setting the matriculation number.
The list of students is then saved into the file univstud.xmi by using the
saveFile-method of the manager.
Note that, for example, the inClass reference of a student would not be preserved when migrating a student from primary to secondary school if this virtual model is used, since this attribute can only be set in the PrimSec virtual model and all models which are more specific.
Example files
Download the Example from the paper. You can open it in eclipse by using File->Import->Archive file or by extracting it and then using File->Import->Existing projects into workspace. Note that it might be sometimes required to clean the project once or twice and/or delete the files in the apt_generated directory to correctly generate all files.
Download the Source code for the annotation processor.
You need to have the Eclipse Modeling Framework installed. The Eclipse Modeling Tools package might serve as good start point. Be aware that generating
a usable .jar seems to be a bit tricky: I generated a jar for the second project, extracted it, generated a runnable jar for the first project, extracted it and then copied the folders at, com, javax, org and templates from the runnable jar into the extracted folder of the other jar, zipped
everything and renamed it to .jar again.